

THE FLEET GUIDE
Table of Contents:
I.. FAQs
II. Preparation
----A. Assembling a fleet
----B. Buying, Equipping, Renaming
----C. Setting Up an Automated Resupply Chain
----D. Understanding Various Game Mechanics
III. Fleet Combat
----A. Invading a Sector
----B. The Attack
----C. Do’s and Don’ts in Battle
----D. Left and Right Monitor Tricks
IV. Credits
=============================================================================================
I.. FAQs
Q - Why use fleets when I can wipe a sector clean with a lone M2 or M7M?
A - Flying alone seems efficient but there are times that the player will need to call in support ships to deal with an overwhelming enemy. This is where a fleet and the knowledge to control them come in. Fleet action also looks awesome!!
Killing everything using OP missile spam is pretty boring. Even though I said that, M7M and M8 still has a role in the fleet especially if you assign it to a defensive role
Q - What’s the point of fighting [insert Race name] when they can just spawn the ships I destroyed instantly out of thin air?
A - If you are running SETA all the time you'll think that destroyed ships just spawn instantly, fully equipped and ready to fight you again while you’re still rearming your ship.
Jobs engine (the one who determines how many ships fly in the universe and what they do) really does spawn ships fully equipped and combat ready BUT it also has a timer before this happens. This delay gives enough time for the player to replace fallen fleet members faster than the AI can spawn them.
Q - Is there an easy way to create a fleet? It takes too much time and eats credits faster than my traders can earn money!! Even building large complexes is not this expensive!!
A - There are scripts and mods that automate the buying and equipping of ships with various weapons and equipments. But even with mods you still need to manually adjust certain things such as jump drive configs, missile and ammo resupply, enable MDM, and add the ship to a wing/fleet.
In a vanilla game, you will need to do everything manually. I will create a section in this guide that talks about how to do it faster. So for now just keep reading
Creating a fleet and maintaining them is expensive especially the M1 and its fighters. It is also tedious and boring. Because of this, I urge you not to do it all in one go. Just buy and equip small batches of ships for every time you play X, then just do your own thing. Steal some capital ships if you feel like not buying them. Before you know it you'll have a combat fleet ready to lay waste on your enemies.
Q - How many ships should I use?
A - It depends on how many ships can you effectively command. Maybe new players can just control one capital ship and one fighter wing. For experienced players, maybe unlimited number of capital ships and 8 main wings + 3 SEWN wings. The limit only comes from how much strain can your PC handle
Q - Who should I use my fleet against?
A- Anyone!! Fight [insert race name]'s RRF fleet. Declare war on the Argons and Terrans resulting in a three-way-battle-royal inside war sectors, or just eradicate the universe with Xenon and Pirate infestation. Just one tip, keep friends with at least one Race. A certain mission in AP can prove to be really difficult to finish by fighting solo, so you might need a fleet to help you complete that particular plot
Q - Is this guide relevant to older X-games?
A - This guide is written for X3AP but most points are still relevant to X3TC. (Don’t ask about X-R since I have not played it)
=================================================================================================
II. Preparation
A. Assembling a Combat fleet
Fighters
This is the fleet’s bread and butter. Fighters, when equipped properly, can dish out more damage than an M7M. Fighters also act a distraction for the enemy turrets while bigger ships hammer through the shields and hull.
Roles: fighters can fulfill many roles during fleet operations depending on its weapon configurations. PAC/PRG fighters are geared towards an anti-fighter role while HEPT/EBC is better at pounding M6 and M7 ships. When armed with nothing but Thunderbolt missiles, M3s become makeshift bombers that can obliterate M7, M2, and M1s in short order.
a. M3 and M3+ - the first choice fighter for fleet operations. It can mount hard hitting weapons like HEPT and EBC for big damage against any targets. They are, however, costs millions to buy so losing too many of them can be disheartening. Any M3 is suitable for fleet action but it is preferred that the ship you choose have a back turret for missile defense.
Best ships you can use:
• Argon Eclipse - 200mj shielding, 2 turrets, decent speed, decent cargo space
• Teladi Falcon Hauler - 200mj shielding, 1 turret, decent speed, excellent cargo capacity
• Argon Nova Raider - 75mj shielding, 1 turret, fast, cheap to purchase en mass
• ATF Fenrir - 150mj shields, energy efficient EMPC as weapons, 2 turrets, fast, looks cool
b. M4 and M4+ - Generally unloved middle of the road class fighter. M4s are not fast enough to do any interception duties and don't carry enough weapons to be the choice fighter in fleet action. Most M4s does not have back turrets for missile defense coupled with their poor shielding making them an easy prey for RRF fighters. The main reason for using these ships over an M3 is their price tag - they are waaaay cheaper than an M3
Best ships you can use:
• OTAS Solano - 75mj shields, fast, cheap
• Boron Pike - 25mj shield, cheapest carrier worthy M4+, surprisingly powerful frontal firepower when loaded with EBC
c. M5 - Don't use it for fighting. Send a pair of them through a gate using "Map Sector...” or “Move To Position...” command to scout for enemies. Some M5 can carry M-class cargo which can be useful in delivering Jump Beacons to the target location -- see part III
Best ships you can use:
• Teladi/Pirate Kestrel - fastest M5, back turrets for missile defense.
Tip: Always equip your fighters with missiles and set their missile fire probability reasonably high. This will help them survive more in combat.
d. Fighter Drones - A very cost effective alternative for the expensive fighters especially in OOS battles. These drones when deployed in mass, can match the firepower of a fighter swarm. Drones are also small and agile enough that it can avoid flaks better than any M5. The main disadvantages of using fighter drones over fighters is that controlling them is very restricted - you can only issue commands to all drones or one by one. They also can only mount up to 2 weapons and no missiles. Drone's hull is very thin making them ineffective against enemies with PSG and PBG. You need many drones for them to be effective which can cause major pc slowdowns because of too many things flying around.
Best drone:
• Any Drone - deploy en mass. These little critters have one or two weapons installed to greatly support your fleet in fighting against any enemy. When 1000+ of these things are flying around, no enemy fleet can hope to survive.
M6
This ship class is more suitable as player ship and backwater patrol leaders rather than fleet vessels. The main reason for this is that most M6 maneuvers like a brick. Just like a fighter, most of its damage comes from the main guns. M6 turrets are only good enough to protect it from missiles and some lighter fighters. They are also classed as "big ships" making them jump to gates one by one instead jumping together. If you ever decide to use M6 in fleet operations, the best way to deploy them in the battlefield is to have another ship carry them there such as the Aran.
Roles: an M6 wing is excellent at killing M7s. Due to their "big ship" classification, the AI will use anti capital weapons at them so make sure they stay well away from M1 and M2s until your fighter/drone swarm can support them in the attack. Suitable Personal wingmen that will act as quick reaction team that can cancel respawning ships in Xenon sectors
Best ships you can use:
• Paranid Hyperion Vanguard - best used as a playership but is also deadly in the hands of the AI. It is also one of the three M6 that can maneuver decently. It also docks 2 fighters making it the only M6 with the capability to do so. This ship is also oddly capable of firing the powerful Wraith missiles for dealing with capital ships. Hypes cannot be bought on shipyards and must be boarded.
• Aldrin Springblossom - Crazy fast. Being Terran made this ship can mount P-M/AML which uses ammunitions instead of laser energy. It is also the only M6 that can mount Frigate class flak weapon: the P-SSC. Springblossom actually has a decent maneuverability. This, however, was offset by its ridiculous speed.
M7
These ships are easily the most versatile Capital class vessel. M7s can become your main anti-fighter platform when equipped with flaks, or an anti-capital support ship with IBLs that will help your M2 in fighting other capitals. Or you can have a mixture of both in one M7. M7C also carries fighters in the battlefield so it may be a good idea to replace M1s with the likes of Ariadne, Panther, and Guppy.
Roles: Stand alone Anti-Fighter platform or Anti-capital support ship. Faster M7s can also act as Personal wingmen that will act as quick reaction team that can cancel respawning ships in Xenon sectors
Best ships you can use:
Anti-capital M7
• Split Tiger – With IBLs for its main guns, this ship can wreak extraordinary damage on another capital ship. Tiger also makes good use of the A.I.’s tendency to just fly straight at the target by exposing only a small cross section of itself to return fire at. It is also one of the ships that can effectively fulfill both anti-fighter and anti-capital roles
• Xenon Q – By now you must have already known how dangerous a Q can be against any capital ship. But the real advantage of this ship is that, when successfully boarded and re-engineered on the PHQ, the Q can be produced in just 19 hours. Making it a really good swarm M7 if you are role-playing
Anti-fighter M7
• Argon Cerberus/Astraeus – Cerberus and Astraeus are similar ships with Cerberus having better laser and shield generators as well as being able to mount flaks at all weapon slots including the main guns. Astraeus however is the fastest M7, out-speeding the Cerberus by 30m/s
• Argon Griffon Sentinel – Griffon can fire up to 10 flaks at a single enemy killing lightly shielded fighter in one volley. While other M7 can do this too, only the Griffon can do it consistently. It is also the smallest M7 at roughly just 2 ½ times the size of an M6+. This allows the Griffon to dance around enemy capital ships longer than any M7 before it needs to be jumped to safety.
Missile boats
Overall this class of ships is OP. M8 and M7M is the most cost effective weapon in dealing with anything hostile. I rarely use an M7M and M8 offensively in fleet operations. They tend to steal the spotlight away from other fleet members (which may be a good thing since hostiles die fast and minimal losses incurred from my own fleet). Instead, I use them defensively by giving them rearguard and counter missile roles. The M7M is also the best counter for other M7M (I find it really cool to see 2 M7M exchange missiles)
Roles: Rearguard, Counter – Missile roles, Station Buster, and Nuke-everything (rarely used for this role)
Best ship you can use:
M7M – you can use any M7M that you like
M8 – Any bomber is suitable but the one with the most balanced stats is the Paranid Hades. Also just like the M6 and TM ships, M8s cannot jump together since they are classified as “big ships”
M2
The fleet’s big daddy. They can mount the biggest guns and the strongest shields in the fleet but because of this M2s are realllyyy~~ slow! It should be noted that M2 may be good at destroying capitals, they themselves are vulnerable to enemy M2s so don’t make them fight 1 on 1 with them.
Roles: Destroyers have one role in a fleet – Destroy anything
Best ships you can use:
• OTAS Boreas – the strongest Commonwealth M2. The Boreas can fit some sort of anti-capital ship weapon in all of its slots. This weapon configuration proves to be devastating to opposing capital ships, but leaves the Boreas open to fighter and missile attack. It is also one of the fastest M2 in the game. All of this firepower and speed is packed inside a hull no longer than a Split Panther – making the Boreas the smallest M2 in the game
• Terran Osaka – Osaka one of the two most heavily shielded vessel among the normal M2. It also has the best laser capacity and recharge that enables it to fire all if its guns (assuming F,R,L have PSP and the rest is SSC) for 75 sec before running dry.
• Xenon I – the only downside of this ship is the fact that Xenon ships are really hard to acquire. Overall, the Xenon I is a MONSTER, nuff said.
M1
The heart of a fleet. M1 Carriers are dangerous combat support ships carrying entire wings of fighters in the battlefield. Though they can carry anti-capital weapons, M1s should not be pitted against other capitals.
Roles: Fleet carrier, a suitable fleet Commander for smaller fleets
Best ships you can use:
• Goner Aran – This ship has no weapons, no missiles, and can only dock 30 ships; it is so large and so slow that even pilots on high spaceweed will never miss while shooting it, sounds disappointing right? But the Aran can dock any other ship in the game – 29 small ships + 1 capital ship. So in theory, one Aran can dock 29 Hyperions with 2 fighters each and a Raptor with 65 fighters. That’s a total of 123 fighters and 29 M6 being carried by just one ship. Aran can also dock other Arans making the fleet carrying possibilities infinite. This ship also has the largest cargo capacity in the game (though it cannot carry stations)
• Split Raptor – 65 fighters, can mount Gauss cannons in case it needs to fight someone, the second fastest M1 in case you need to flee.
• Argon Colossus/Yaki Shuri – both ships are identical with 60 fighters
• Terran Tokyo – 50 fighters. If you really want to take an M1 to a close range brawl then this ship is the best choice. It has the best laser recharge than any other M1 in AP and also has a laser capacity only inferior to its ATF brothers
B. Buying, Equipping, Renaming
Buying and Equipping
Buying and equipping of ships is PITA especially with fighters. But we don’t have a choice other than to do this or we can’t create a fleet at all. Luckily for us playing in AP, shipyards can now let players equip ships in bulk.
• Have one M1 carry all weapons, shields, mosquito missiles, ammo and other things the fighter you want to buy might need. Then order it to “Move to position” to the shipyard where you intend to buy fighters
• Buy fighters and equip them with necessary softwares
• Rename one ship and order it to “Idle”, it should undock. This will be the group leader
• Broadcast “Follow…” command to all remaining ships in the shipyard and make them follow the group pleader
• Order your M1 to “Resupply Ships” and target the group leader. This command will not only transfer wares to the group leader but also to all of its followers. Transfer weapons intended for the main guns first then transfer weapons for the turrets next. Then repeat the command for shields, mosquito, ammo and stuff.
Note: when your M1 does not have enough wares to resupply the group it will try to buy from NPC within 3 sector jumps away, if no wares are found, the M1 will still run the command but will not do anything. Have another ship transfer the needed wares to the M1 so that the command will finish.
• Tell the group leader to dock at the M1, all followers should dock too. Then jump the M1 to the next shipyard. Order the group leader to dock to shipyard and buy all necessary things in bulk
Note: Normal shipyards will only accept up to 5 fighters docked at the same time so it is better to use Supershipyards instead because they can dock unlimited number of Fighters/M6/TM/TP/TM
• After all necessary softwares are bought and all equipments transferred you must now set MDM and Ammunition resupply manually to all ships (there are no known ways to automate these in a vanilla game)
• Then add all fighters to a wing. Have one ship and set its missile resupply to desired levels then click “copy to all ships in wing”
• You can set turret commands, Homebase, and Advanced jumpdrive configs, missile fire probability from the wing console. This will take effect on all ships in the wing
• To set the formation of the wing, dock them to their homebase and go to “Docked ships” – “Docked ships Console” then set the desired formation
Note: the wing formation option in the Wing Console does not set the default formation of the ships in the wing. Instead, if you have more than one formation leader in a single wing it will determine how these formation leaders fly with each other. The followers of the formation leader will still use the default formation of the ship they are following.
Renaming
Renaming ships is optional, but doing this helps you in locating a specific ship over the long lists of ships in the Sector Map, Wing Console, and Owned Ships list if that ship is homebased to something. It is also useful when ships are destroyed in battle.
Message Log will appear like this is your ships are not renamed:
“Your ship Your Nova Raider from factory Your Colossus is destroyed by Xenon K in sector Xenon Core 023”
Sounds silly and unhelpful right? If you rename your ship it will go like this:
“Your ship C01 Fighter 18 from factory Colossus 01 is destroyed by Xenon K in sector Xenon Core 023”
This is very useful in determining which carrier needs to be resupplied with new fighters. It also gives names to the valiant pilots who offered their lives for your great cause…
C. Setting up an automated resupply chain
While you can issue other commands such as “Resupply and Rearm” for wings, “Supply ships” for manual rearming of ships, or the Fleet Command’s own “Resupply and Refuel Fleet Ships”, I find them all inefficient and somewhat lacking. They are also not automatic.
The most efficient fire and forget resupply method that I found is with the use of CLSmk2. We will first need 4 high level CLS mk2 pilots. We will use 3 TS (one for M1, M2 and M7) that will automatically rearm our ship when the fleet is not in use. The last pilot is for a signal driven CLS resupply TL that can jump and rearm the whole fleet during the heat of the battle.
Here is the set up for my automatic resupply TS that equips my Griffons:
Please take note that your Supply TS and TL will only start the resupply sequence once the ships it has to deliver good to has NO ORDERS. Cancel all orders or dock your fleet vessels in a station first.

Use "Load Up to" and "Unload Up to" commands instead of other options because it gives you more control at how much wares should your TS take at your stations/storage ships and give them to you fleet members
I also set them to only resupply my Griffons when at least 20% of its wares are remaining. And set it to transfer wares only when my Griffons are in the same sector as the TS.
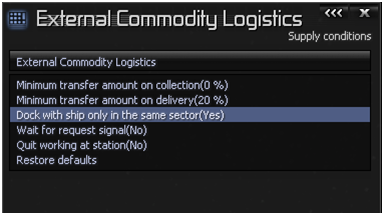
If you set the minimum transfer rate too low, your TS might chase its assigned ships to hostile sectors. And if you set the rate too high, your TS might just ignore its assigned ships making their supply incomplete.
For the Resupply TL, the same set up is used but this time I have to combine all waypoint made in all Resupply TSs’ and manually enter them in the TL. Then I set it to fully rearm my ships by setting the minimum transfer amount to 0 and I set it to wait for my signal before it can work.
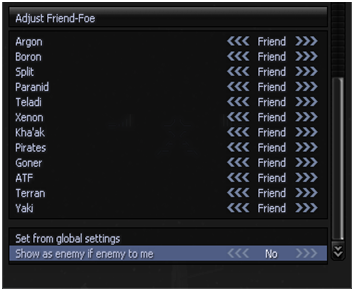
I also need to set its Friend-Foe setting so it could see any race as friendly. Doing this will ensure my TL will jump to me when I’m fighting in hostile sectors

The TL will only jump from the gate. This may be dangerous of you are fighting the RRF.
D. Understanding various game mechanics
Advanced Jump Drive Configuration and Jump Beacon
1. Autojump
You must set all ships in the fleet to auto jump. And for these reason every member of the fleet should have e-cells for jumping -- even the fighters. Another thing, Emergency Jump option for capital ships DOES NOT WORK... to jump ships out of the battle you have to order it manually.
2. Jump Beacons
Jump Beacons are rare. There is a very low chance that an RRF ship will spawn with it onboard. Jump Beacons can only be acquired by boarding RRF ships that carry them (or if the one carrying it is an M8 you can try and make the pilot bail out which is very unlikely for RRF ships).
Using Jump Beacons is also the best way to jump a fleet to a sector. Ships will jump together regardless of its size. I recommend that you have at least 2 Jump Beacons, one for invading a sector and one for retreating.
Out-of-sector (OOS) mechanics
There are a lot of threads that talks about this already so I’ll just do a quick enumeration of what you should remember:
• Battles are done in rounds where one OOS round last 5 sec. if you are watching it on the sector map and 30 sec. if you are not
• All guns are fired at the same target in one round; additionally in AP capital ships can fire at multiple fighters at once (maximum of 3? – needs to be confirmed...)
• The gun with the biggest DAMAGE PER SHOT wins; rate of fire, range and projectile speed is not taken into account (ex. a PAC equipped fighter will win against a PRG equipped fighter)
• Ammo based weapons will use one crate of ammo per round making them not practical for OOS battles
• Don’t use missiles unless it is a firestorm or a hammerhead. Your ship will choose to fire ONE missile or fire all of its guns in a round. So if the missile chosen is not high yield you will lose potential damage.
• The faster ship will fire all weapons first. It is possible that the faster ship will one-shot its opponent, killing it before it could fight back.
• Collision detection is disabled, and all ship will run at maximum installed speed,
• Blindspots, ships maneuverability, size, turret placements and other design flaws are not taken into account
• Shields and Guns do all the talking here
1. Turret Commands and Configuration, Laser Switching, and MDM
Turret Commands and Configuration
A new addition to AP. Turret Command Configuration lets us set target priorities for our turrets. Very useful when you want certain turrets to only fire at specific types of ships and ignore others.
I’ll only discuss three commands as they are the most important.
1. Turret: Attack Capitals
Since the anti-capital guns that usually run this command are too slow to turn you must prioritize capital ships as first targets before anything else. This command should not run any anti-fighter and anti-missile priorities. Even when an M7M and M8 are in sector, this command should not be changed to another turret command unless enemy ships are really far away.
My usual configuration:
1. Turrets attack what the ship is attacking
2. Turrets attack capital ships (M7 and bigger)
3. Turrets attack capital ships (M6 and bigger)
Rationale: In a fleet, most ships are controlled by the AI and I usually command them to target specific ships to attack. Using this order, the ships turrets will prioritize its target before firing anything else.
For example:
I ordered my M2 to attack a Xenon K that is escorted by a Xenon P and a Xenon Q. The Q and the P entered the firing range of my destroyer’s guns at the same time. My M2s turrets will ignore the P and start firing at the Q. The moment the K entered the range, the M2’s turrets will ignore both the Q and the P and start firing at the K. Then, I changed my mind and ordered the M2 to attack the Q since it does more damage than the close-but-still-far-away K. In that moment, my M2’s turrets will ignore the K and kill the Q then turn for the K again and lastly to the forever ignored P.
2. Turrets: Attack Fighters
This is the staple command used in Anti-fighter M7’s turrets and to all turrets that can fit a flak weapon
My usual configuration:
1. Turret attack what the ship is attacking
2. Attack Fighters
3. Missile Defense
4. Attack Capital Ships (M6 and bigger)
5. Protect the ship. Attack anything that attacks it
Rationale: The same as above, your ship’s turrets must prioritize their target first before shooting anything else. This configuration covers all kinds of enemies except stations. While it offers some form of missile defense, it is not a very efficient one because the turrets will attack a harmless M5 first than shooting at a heavy damage missile. Protect ship is there because when fighting at a sector with heavy trader traffic such as Hatikvah’s Faith, I notice that passing enemy TS and TP’s will shoot at my ships but my turrets can’t shoot back because they are not set to do so (TS and TP are classified as Transports and is not included in Attack Fighter priority but they are included in Attack any Enemy priority).
3. Turret: Missile Defense
This command should run on all your fighter wing’s turrets and some of your capital ships turrets. Use this command on ALL ships when an M7M and M8 are in sector.
My usual configuration:
1. Missile Defense
2. Turret attack what the ship is attacking
3. Attack Fighters
4. Attack Capital Ships (M6 and bigger)
5. Protect the ship. Attack anything that attacks it
Rationale: This command should offer the most missile protection possible while still able to attack enemies. But overall it is similar to Turret: Attack Fighter Command.
Laser Switching
A really cool feature that is included in AP. When activated, it allows the player owned ships to switch laser automatically on all of its turrets. This option will use all available lasers in your cargo bay. I don’t really use this feature because it doesn’t take into account what guns can actually hit its intended target. Instead, it will use a gun that corresponds on how far away the target is. (for example: even if the enemy is just a fighter, as long as it stay within 6km your turrets will use anti-capital guns such as PPC to fire at it… which never hit anything smaller than an M7 at that range.)
Tip: Enemy capital ships will switch laser by default. You can exploit this by fearlessly charging your capitals at the enemy. When one of your capitals or corvettes get close to the enemy, it will switch to a lesser damaging weapon such as a CIG/HEPT, severely cutting down its potential damage to your ships.
Missile Defense Mosquito
Available only when you install the Bonus pack. MDM is effective at defending your ships against missiles. This script will automatically fire mosquito missiles at all incoming missiles within 10 km for capital ships and 5-7 km for M6 and smaller. Activate this in ALL ships in the fleet for maximum protection against missiles. It has two features: first is the MDM which only works only on the ship running it. The second is MDM.C; apparently your ships running this command will protect not only itself from missiles but other ships too…
Note: MDM and MDM.C will only work if you have Mosquito missiles on your ship’s cargo hold. If it runs out/you sold it/ got eaten by spacefly, the command will disappear so you may have to resupply mosquitoes again then reissue the command. When activated in an M7M, it should be noted that Missile Defense Mosquito is independent from Missile Defense turret command. When both are running together these causes your ship to fire 2 Mosquito Missiles at a single incoming missile.
Notable Commands and How They Work
1. Wing commands
Attack All – Your ships in the wing will split into groups and attack different target in the sector.
I don’t issue these command at all since ships splitting and attacking different targets can be detrimental to the wings survivability. If there is no real threat in the sector anymore, this command may be useful in cleaning up the remaining stranglers.
Protect – Your wing will protect its designated target from attacks. Ships running this command will not actively seek enemies and will only react if the ship they are protecting is under attack. If the ship they are protecting have a hangar, the wing will dock until an enemy attacks.
This command is useful if you want to keep your wing from scattering all over the sector.
Attack Target of – Orders your wing to attack the designated target of one of your ships. To make it work, give this order to your wing then order their assigned ship to attack something. Both the wing and their assigned ship will attack the target.
This command is useful when you want one of your ships to break off from the fleet and attack something else and you need a wing to support it.
Attack Nearest of – This command is like an aggressive “Protect” command. Ships running this command will attack any enemy that is within 10 km of the ships they are protecting. If the ship they are protecting have a hangar, they will dock when no enemy is around
This command is useful if you want the wing to aggressively seek out enemies while keeping them close to the fleet.
2. Fleet Commands
Call to Arms – this is like a universe-wide “Follow me” command for all ships that belong in the fleet. Upon arriving at the fleet commander’s location the fleet ships will try to refuel and rearm missiles and E-cell depending on its resupply settings
I find this as the only useful command among the bunch. And its only use for me is grouping your fleet together in one sector.
Invade Sector – all fleet ships will jump to the target sector. They will utilize all gates in the sector. (ex. If there are 3 gates, 3 capital ships will jump at the same time using one gate for each) Upon arriving, the fleet ships will attack all enemies and stations.
I really appreciate Egosoft when they tried to remedy the gate traffic problem by making all fleet ships use all available gates for jumping. But another problem start, RRF will also jump at different gates making these command a very risky method in attacking a sector. Seriously, you are better off with jumping your fleet in jump beacons.
Resupply and Refuel Fleet Ships – this command will only be available if a TS or TL is part of the fleet.
This command is somewhat obsolete as CLS MK2 can do whatever this command does and does it more efficiently
Tip: Broadcast to all fleet ships – When this command is issued from the fleet commander it will only take effect to all ships under that fleet commander. This is very useful when you have more than one commander in a sector.
3. Combat Commands
Attack – the ship will move in a straight line at full speed towards the target.
Attack Capital Ships – The ship will actively seek out capital ships within --- 10km range!! If none is found the ship will attack any enemy, and if no enemy is found the ship will go “Idle”
That 10 km range limit is seriously stupid. You are better off at giving “Attack” command to make your ships target a specific ship
Attack Fighters - The ship will actively seek out fighters within --- 10km range!! If none is found the ship will attack any enemy, and if no enemy is found the ship will go “Idle”
That 10 km range limit is seriously stupid. You are better off at giving “Attack” command to make your ships target a specific ship. Alternatively, you can order you anti-fighter M7 attack an enemy patrol group (such as a PX escorted by fighters). After killing the patrol leader, you can issue this command so that your M7 will kill all remaining fighters.
Retreat – This is perhaps the least used command of the bunch and perhaps the most useful. What it does is it lets you select a station or a location in the sector map for your ship to retreat to. The unique feature of this command is that ship running it will IGNORE all attacks and flies to its designated position/ship/station in a straight line.
In some occasions, I use this command as an alternative to “Move to Position”. This will guarantee that my ship will move to that location without getting interrupted.


